I recently finished a large metagenomics sequencing experiment – 96 10X Genomics linked read libraries sequenced across 25 lanes on a HiSeq4000. This was around 2TB of raw data (compressed fastqs). I’ll go into more detail about the project and data in another post, but here I’m just going to talk about processing the raw data.
We’re lucky to have a large compute cluster at Stanford for our every day work. This is shared with other labs and has a priority system for managing compute resouces. It’s fine for most tasks, but not up to the scope of this current project. 2TB of raw data may not be “big” in the scale of what places like the Broad deal with on a daily basis, but it’s definitely the largest single sequencing experiment I and our lab has done. To solve this, we had to move… TO THE CLOUD!

By utilizing cloud compute, I can easily scale the compute resources to the problem at hand. Total cost is the same if you use 1 cpu for 100 hours or 100 cpus for 1 hour… so I will parallelize this as much as possible to minimize the time taken to process the data. We use Google Cloud Comptue (GCP) for bioinformatics, but you can do something similar with Amazon’s or Microsoft’s cloud compute, too. I used ideas from this blog post to port the Bhatt lab metagenomics workflows to GCP.
Step 0: Install the GCP SDK, Configure a storage bucket.
Install the GCP SDK to manage your instances and connect to them from the command line. Create a storage bucket for data from this project – this can be done from the GCP console on the web. Then, set up authentication as described here.
Step 1: Download the raw data
Our sequencing provider provides raw data via an FTP server. I downloaded all the data from the FTP server and uploaded it to the storage bucket using the gsutil rsync command. Note that any reference databases (human genome for removing human reads, for example) need to be in the cloud too.
Step 2: Configure your workflow.
I’m going to assume you already have a snakemake workflow that works with local compute. Here, I’ll show how to transform it to work with cloud compute. I’ll use the workflow to run the 10X Genomics longranger basic program and deinterleave reads as an example. This takes in a number of samples with forward and reverse paired end reads, and outputs the processed reads as gzipped files.
The first lines import the cloud compute packages, define your storage bucket, and search for all samples matching a specific name on the cloud.
from os.path import join
from snakemake.remote.GS import RemoteProvider as GSRemoteProvider
GS = GSRemoteProvider()
GS_PREFIX = "YOUR_BUCKET_HERE"
samples, *_ = GS.glob_wildcards(GS_PREFIX + '/raw_data_renamed/{sample}_S1_L001_R1_001.fastq.gz')
print(samples)
The rest of the workflow just has a few modifications. Note that Snakemake automatically takes care of remote input and output file locations. However, you need to add the ‘GS_PREFIX’ when specifying folders as parameters. Also, if output files aren’t explicitly specified, they don’t get uploaded to remote storage. Note the use of a singularity image for the longranger rule, which automatically gets pulled on the compute node and has the longranger program in it. pigz isn’t available on the cloud compute nodes by default, so the deinterleave rule has a simple conda environment that specifies installing pigz. The full pipeline (and others) can be found at the Bhatt lab github.
rule all:
    input:
        expand('barcoded_fastq_deinterleaved/{sample}_1.fq.gz', sample=samples)

rule longranger:
    input:
        r1 = 'raw_data_renamed/{sample}_S1_L001_R1_001.fastq.gz',
        r2 = 'raw_data_renamed/{sample}_S1_L001_R2_001.fastq.gz'
    output: 'barcoded_fastq/{sample}_barcoded.fastq.gz'
    singularity: "docker://biocontainers/longranger:v2.2.2_cv2"
    threads: 15
    resources:
        mem=30,
        time=12
    params:
        fq_dir = join(GS_PREFIX, 'raw_data_renamed'),
        outdir = join(GS_PREFIX, '{sample}'),
    shell: """
        longranger basic --fastqs {params.fq_dir} --id {wildcards.sample} \
            --sample {wildcards.sample} --disable-ui --localcores={threads}
        mv {wildcards.sample}/outs/barcoded.fastq.gz {output}
    """

rule deinterleave:
    input:
        rules.longranger.output
    output:
        r1 = 'barcoded_fastq_deinterleaved/{sample}_1.fq.gz',
        r2 = 'barcoded_fastq_deinterleaved/{sample}_2.fq.gz'
    conda: "envs/pigz.yaml"
    threads: 7
    resources:
        mem=8,
        time=12
    shell: """
        # code inspired by https://gist.github.com/3521724
        zcat {input} | paste - - - - - - - -  | tee >(cut -f 1-4 | tr "\t" "\n" |
            pigz --best --processes {threads} > {output.r1}) | \
            cut -f 5-8 | tr "\t" "\n" | pigz --best --processes {threads} > {output.r2}
    """
Now that the input files and workflow are ready to go, we need to set up our compute cluster. Here I use a Kubernetes cluster which has several attractive features, such as autoscaling of compute resources to demand.
A few points of terminology that will be useful:
- A cluster contains (potentially multiple) node pools.
- A node pool contains multiple nodes of the same type
- A node is the basic compute unit, that can contain multiple cpus
- A pod (as in a pod of whales) is the unit or job of deployed compute on a node
To start a cluster, run a command like this. Change the parameters to the type of machine that you need. The last line gets credentials for job submission. This starts with a single node, and enables autoscaling up to 96 nodes.
export CLUSTER_NAME="snakemake-cluster-big"
export ZONE="us-west1-b"
gcloud container clusters create $CLUSTER_NAME \
    --zone=$ZONE --num-nodes=1 \
    --machine-type="n1-standard-8" \
    --scopes storage-rw \
    --image-type=UBUNTU \
    --disk-size=500GB \
    --enable-autoscaling \
    --max-nodes=96 \
    --min-nodes=0
gcloud container clusters get-credentials --zone=$ZONE $CLUSTER_NAME
For jobs with different compute needs, you can add a new node pool like so. I used two different node pools, with 8 core nodes for preprocessing the sequencing data and aligning against the human genome, and 16 core nodes for assembly. You could also create additional high memory pools, GPU pools, etc depending on your needs. Ensure new node pools are set with --scopes storage-rw to allow writing to buckets!
gcloud container node-pools create pool2 \
    --cluster $CLUSTER_NAME \
    --zone=$ZONE --num-nodes=1 \
    --machine-type="n1-standard-16" \
    --scopes storage-rw \
    --image-type=UBUNTU \
    --disk-size=500GB \
    --enable-autoscaling \
    --max-nodes=96 \
    --min-nodes=0
When you are finished with the workflow, shut down the cluster with this command. Or let autoscaling slowly move the number of machines down to zero.
gcloud container clusters delete --zone $ZONE $CLUSTER_NAME
To run the snakemake pipeline and submit jobs to the Kubernetes cluster, use a command like this:
snakemake -s 10x_longranger.snakefile --default-remote-provider GS \
    --default-remote-prefix YOUR_BUCKET_HERE --use-singularity \
    -j 99999 --use-conda --nolock --kubernetes
Add the name of your bucket prefix. The ‘-j’ here allows (mostly) unlimited jobs to be scheduled simultaneously.
Each job will be assigned to a node with available resources. You can monitor the progress and logs with the commands shown as output. Kubernetes autoscaling takes care of provisioning new nodes when more capacity is needed, and removes nodes from the pool when they’re not needed any more. There is some lag for removing nodes, so beware of the extra costs.
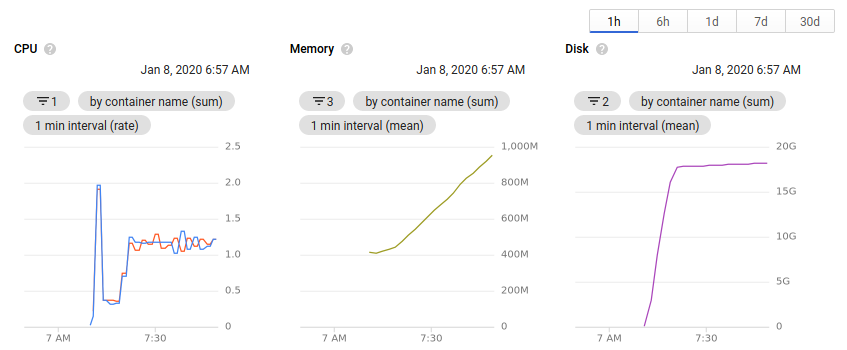
While the cluster is running, you can view the number of nodes allocated and the available resources all within the browser. Clicking on an individual node or pod will give an overview of the resource usage over time.
Useful things I learned while working on this project
- Use docker and singularity images where possible. In cases where multiple tools were needed, a simple conda environment does the trick.
- The container image type must be set to Ubuntu (see above) for singularity images to correctly work on the cluster.
- It’s important to define memory requirements much more rigorously when working on the cloud. Compared to our local cluster, standard GCP nodes have much less memory. I had to go through each pipeline and define an appropriate amount of memory for each job, otherwise they wouldn’t schedule from Kubernetes, or would be killed when they exceeded the limit.
- You can only reliably use n-1 cores on each node in a Kubernetes cluster. There’s always some processes running on a node in the background, and Kubernetes will not scale an excess of 100% cpu. The threads parameter in snakemake is an integer. Combine these two things and you can only really use 7 cores on an 8-core machine. If anyone has a way around this, please let me know!
- When defining input and output files, you need to be much more specific. When working on the cluster, I would just specify a single output file out of many for a program, and could trust that the others would be there when I needed them. But when working with remote files, the outputs need to be specified explicitly to get uploaded to the bucket. Maybe this could be fixed with a call to
directory()in the output files, but I haven’t tried that yet. - Snakemake automatically takes care of remote files in inputs and outputs, but paths specified in the
params:section do not automatically get converted. I use paths here for specifying an output directory when a program asks for it. You need to add theGS_PREFIXto paths to ensure they’re remote. Again, might be fixed with adirectory()call in the output files. - I haven’t been able to get configuration yaml files to work well in the cloud. I’ve just been specifying configuration parameters in the snakefile or on the command line.